
Introduction
Once you learn something very neatly and understand it very clearly, it feels like you are wasting time doing things over and over again. Same things in setting up a Django project, you feel like you could save those typing minutes by making a script.
In this article, we will make a script a batch script for windows and a BASH script for Linux/macOS. We will make a virtual environment using python and then install the libraries and dependencies like in this case we will install Django. You can also tinker with these scripts and install other dependencies if you want like Django rest framework, crispy forms, markdown, Redis, etc. We will also make a Django project using the positional parameter passed before running the script from the command line.
Python development environment
This article assumes you have a python environment setup. If you don't you must install Python from the official website as per your operating system. Also, you should have pip installed and configured correctly. You can install pip by following the official documentation for the specific operating systems.
Steps in Django Project Setup
So, If you are already familiar with the Django project setup, you can directly use the scripts provided in the next few sections. You can also visit this GitHub repository if you have any issues and errors.
If you are new to django, let me first explain the process of django project setup. - ### Initialize a VirtualEnvironment (Recommended but not necessary)
Virtual Environment in Python is a great way of localizing the dependencies and frameworks only in the particular folder, it allows the developer to separate things out and keep them distinct, Additionally, when deploying or sharing the repository, the other developers can install the dependencies in the requirement.txt file in their local environment flawlessly.
So, it is always recommended to use python virtualenv when working with python frameworks or libraries. We can set it up by simple pip install and then giving it a name.
pip install virtualenv
This will install the package/tool using pip.
After that has been properly installed, we can now give it an appropriate name
virtualenv mytest
The
virtualenv
is the command and
mytest
can be any name, generally
env
or
venv
is preferred but it should be understandable to the user. You will now be able to see the folder inside of your current directory named as
mytest
or the name you've given to it.
Windows
Now if you are on windows, you can activate the virtual environment by using the command :
mytest\Scripts\activate
(mytest)
before the command prompt.
Linux/macOS
For Linux or macOS, you can use the command:
source mytest/Scripts/activate.sh
mytest
can be anything that you have used while creating the virtualenv. This should activate the vrtualenv and will be indicated by
(mytest)
before the prompt in the terminal.
 From the above image, we can see that we created and activated an virtualenv in python in a folder.
So, this is the walkthrough for setting up the virtualenv for a Django project, now we will move to install Django in this environment.
From the above image, we can see that we created and activated an virtualenv in python in a folder.
So, this is the walkthrough for setting up the virtualenv for a Django project, now we will move to install Django in this environment.
-
Installing Django using pip
This is quite straightforward. You can use
pip install django
or
pip3 install django
or the normal way you install a library from pip.
-
Creating a Django project
To create a django project, we use the django-admin command like:
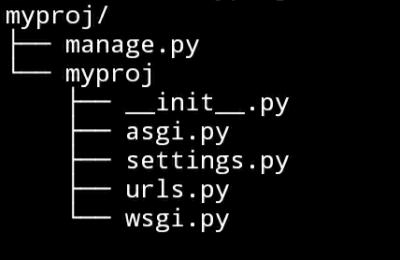
django-admin startproject mywebsite
mywebsite
or your project name anything you like. Inside the
mywebsite
folder, you will have 2 things:
manage.py
file, and
mywebsite
folder . Yes there will be another
mywebsite
folder inside your project which will have the settings, URLs and other global(project-level) configuration files. The
manage.py
file is the most important file here. You should never touch/edit this file. We use this file to carry out all the operations from running the server to managing the database.
Setup script for Windows
The below is a batch file for Windows Operating System. Save the file in a
.bat
extension.
Make sure the file is saved in a
.bat
file and be in the folder where you would like to create the Django project. After being in the appropriate location, enter the following command:
commands.bat myproj
commands.bat
, you can name it anything you like, but I like to keep this a convention. After this you don't need to do anything, everything will be handled by the script.
You can run the server using
python manage.py runserver
cls
command to show the process. It won't break the script if you add this to it.
Setup script for Linux/macOS
Copy the code from the below script and save it in a file preferably called
commands.sh
, you can name it anything you want but keep the
.sh
extension after it to identify it as a shell-script.
After that file is saved locally, you can run the script by passing the positional parameter as the name of the Django project. The command will be like:
bash commands.sh myproj
From the output of the script, you will have created a Django project inside a virtual environment. We can manually activate the virtual environment. You can experiment it within your system as it can be a lot more customizable. This is just bare bone script to start a Django project but you can add your own things into it.
Conclusion
Thus, from this little article, you can get a bit lazier in initializing a bare-bone Django project. We were able to understand the structure of the Django project and how to set up a virtual environment powered by Python.
After understanding those concepts we then moved on to making a script namely a batch file and a shell script to automate the initialization of the Django project. I hope it might have helped in some or another way, Thanks for reading till here. Happy Coding :)